
How to Connect Amalgam to Acumatica
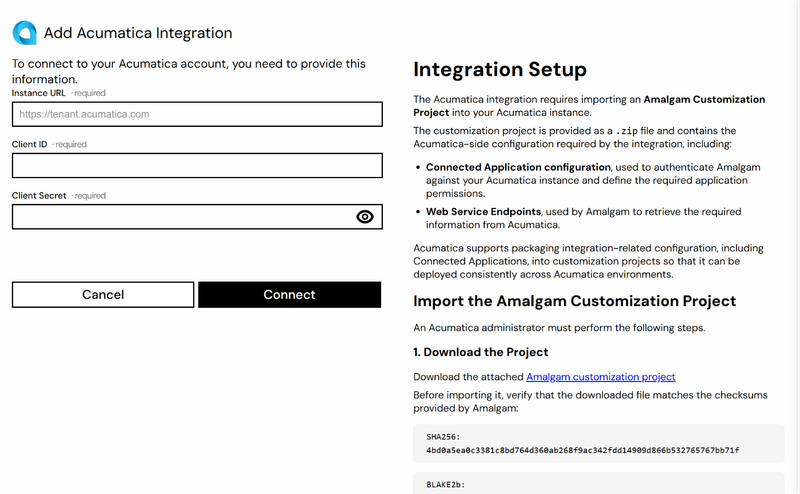
Connect Acumatica to Amalgam to pull your trial balance, balance sheet and aging reports into your spreadsheets, Claude or ChatGPT. Acumatica needs a one-time setup on the Acumatica side: an administrator imports a small customization project that Amalgam provides, then copies two values from it into Amalgam. After that you sign in to Acumatica to approve the connection.
What You Need
Section titled “What You Need”- An Acumatica login with the Administrator role, to import the customization project and read the connected application.
- Your Acumatica instance URL: the address that opens your Acumatica login page, for example
https://yourcompany.acumatica.com, orhttps://erp.example.com/Acumaticafor an on-premise install. Do not include any path after it. - An Amalgam account.
Import the Amalgam Customization Project
Section titled “Import the Amalgam Customization Project”- In Amalgam, open the Acumatica connect page (steps below) and click the Amalgam customization project link in the panel on the right to download the
.zipfile. Check that the file’s checksums match the ones shown in the panel. If they do not match, do not import it; contact Amalgam. - Sign in to Acumatica as an administrator.
- Go to Customization, then Profiles, then Customization Projects (screen SM204505).
- Click Import Project and upload the Amalgam
.zipfile. - Tick the Amalgam project in the list and click Publish. Wait for publishing to finish. Acumatica restarts the site for all users at the end, so do this outside busy hours.
If Acumatica reports errors while publishing, stop and contact Amalgam before going further.
The project installs a connected application named Amalgam Integration and the web service endpoints Amalgam reads from.
Copy the Client ID and Shared Secret
Section titled “Copy the Client ID and Shared Secret”- In Acumatica, go to Integration, then Connected Applications (screen SM303010).
- Open the application named Amalgam Integration and copy the Client ID.
- In the Secrets section, click Add Shared Secret, enter a description, set an expiration date, and generate the secret.
- Copy the secret straight away. Acumatica does not show it again once the window closes.
Treat the shared secret like a password. Do not paste it into tickets or emails.
Connect Acumatica
Section titled “Connect Acumatica”- Log in at app.amalgam.me.
- Click New Integration and choose Acumatica. You can type the name in the search box to find it.
- Enter your Instance URL, Client ID and Client Secret, then click Connect.
- Amalgam sends you to your Acumatica sign-in page. Sign in and approve the access request. You are returned to Amalgam with the integration ready.

What You Can Pull
Section titled “What You Can Pull”Acumatica is a read-only integration. Reports include Trial Balance, Trial Balance Detailed, Balance Sheet, AP Aging and AR Aging, all in beta. See Reports by Provider.
Troubleshooting
Section titled “Troubleshooting”- Sign-in page does not appear or shows an error: check the Instance URL is the one that opens your login page, with no
/entity/...or other path on the end. - “Invalid client”: the Client ID or secret was copied incorrectly, or the secret has expired. Generate a new shared secret and paste it in with Edit on the integration.
- Reports fail after a while: Acumatica expires the connection after 30 days without use by default. Open the integration in Amalgam and reconnect.